|
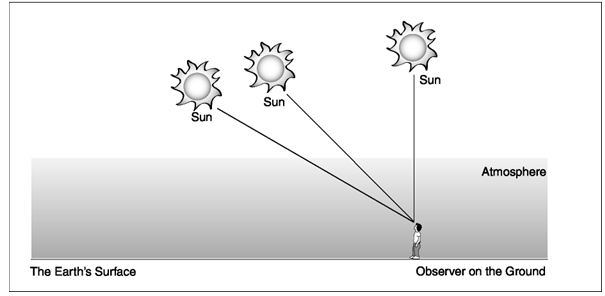
| Figure 1. Relative air mass |
The Aerosol Protocol discussed how the amount (the intensity) of direct sunlight reaching the instrument depends on the amount of atmosphere between the instrument and the sun as well as the amount of aerosol in the atmosphere. So, the relative air mass you calculate in this activity is important for interpreting data obtained using a sun photometer. In the Looking At the Data section of the Aerosol Protocol, the equations are given for calculating aerosol optical thickness from the voltage readings of the photometer. This calculation requires knowing the relative air mass at the time of observation.
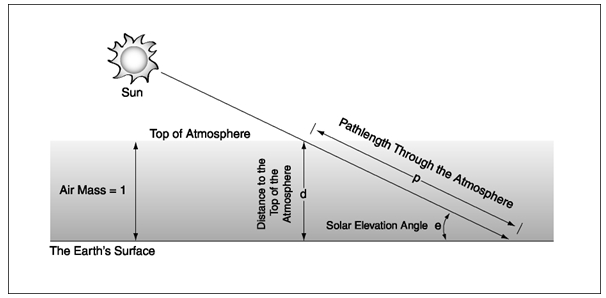 |
| Figure 2. Defining relative air mass. |
In order to help students understand how the solar elevation angle affects relative air mass, make some sketches on the board like those shown above or use an overhead projector to project the figure onto a board or wall. Invite students to use a meter stick to measure the distance from the top of the atmosphere to the observer for solar elevation angles of 90, 45, and 30 degrees. The students should see that as the elevation angle of the sun decreases, the pathlength of sunlight through the atmosphere increases. Have the students find the ratio of each pathlength to the 90 degree pathlength. These ratios are the relative pathlengths through the atmosphere and are the same as the relative air masses.
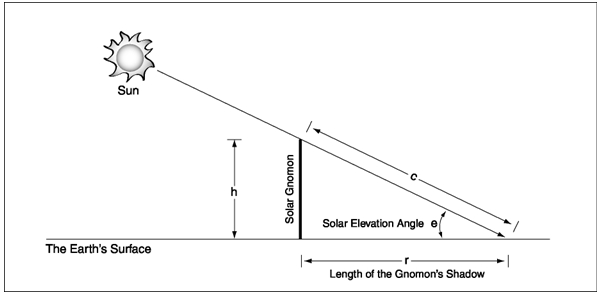 |
| Figure 3. Calculating relative air mass with a solar gnomon. |
Relative air mass can be calculated in the field using the length of the shadow cast by a vertical pole. A pole used for this purpose is called a solar gnomon. Using the concept of similar triangles, the ratio of relative air mass (m) to the height of the atmosphere is the same as the ratio of the hypotenuse of the right triangle (c) to the height of the pole (h):
(Equation 1) m = c/h
For a right triangle,
(Equation 2) h2 + r2 = c2
where r is the length of the sun's shadow cast by the gnomon. Then
(Equation 3) c = (h2 + r2)1/2
Using Equation 1,
(Equation 4) m = (h2 + r2)1/2/h
Using basic trigonometry,
(Equation 5) h/c = sin(e)
where e is equivalent to the solar elevation angle. Then,
(Equation 6) m = c/h = 1/sin(e)
Ask students to speculate about how the relative air mass will affect the intensity of the sunlight that an observer on the ground would see. The important concept is that the longer the pathlength, the less sunlight reaches Earth's surface. This happens even in a clear atmosphere, as students can see by observing that sunlight is not as strong near sunrise and sunset as it is at noontime. Also note that outside the tropics, the sun is never directly overhead and the relative air mass is always greater than one.
Students may ask why the sun looks redder at sunrise and sunset than at noontime. Sunlights path through the atmosphere is longest at sunrise and sunset, so the number of gas molecules and particles that can scatter the sunlight is greatest at these times. The gases in the atmosphere scatter blue light more strongly than red light. At sunset, when the relative air mass is high, the orange and red color dominates because almost all the violet, blue, green, and yellow light has been scattered leaving only the red and orange hues (wavelengths). The relative amounts of different wavelengths in sunlight combined with the relative amount of scattering by gases in the atmosphere gives us our blue sky. During most of the day when we look at the sky and not at the sun, the light reaching our eyes is scattered sunlight, and blue is the predominant color. Aerosols in the sky tend to make the sky look less blue and more milky.
During a day that will be sunny in the morning, set up a solar gnomon outside. Work in groups of three and measure the height of the gnomon and length of the hypotenuse of the triangle formed by the solar gnomon and the shadow it casts using a meter stick, or if the shadow is very long, a tape measure. Have another member of your group help you by holding the meter stick or tape measure at the top of the pole while you read the length at the end of the shadow. (A meter stick is a better choice than a tape measure. If you are using a tape measure, be sure to hold it taut from the top of the pole to the end of the shadow.) Have each member of your group make these measurements. Record the name of the student in your group and each of your measurements in the table below.
| Student Name | Local Time | Universal Time | Pole Height (h) | Hypotenuse Length (c) |
|---|---|---|---|---|
| 1. | ||||
| 3. | ||||
| 3. | ||||
| Average | ||||
| Average relative air mass = caverage/haverage | ||||